Monday 13 May 2024

Two Card Designs, One Stencil

Good Morning.
I've got 2 cards to show you today.
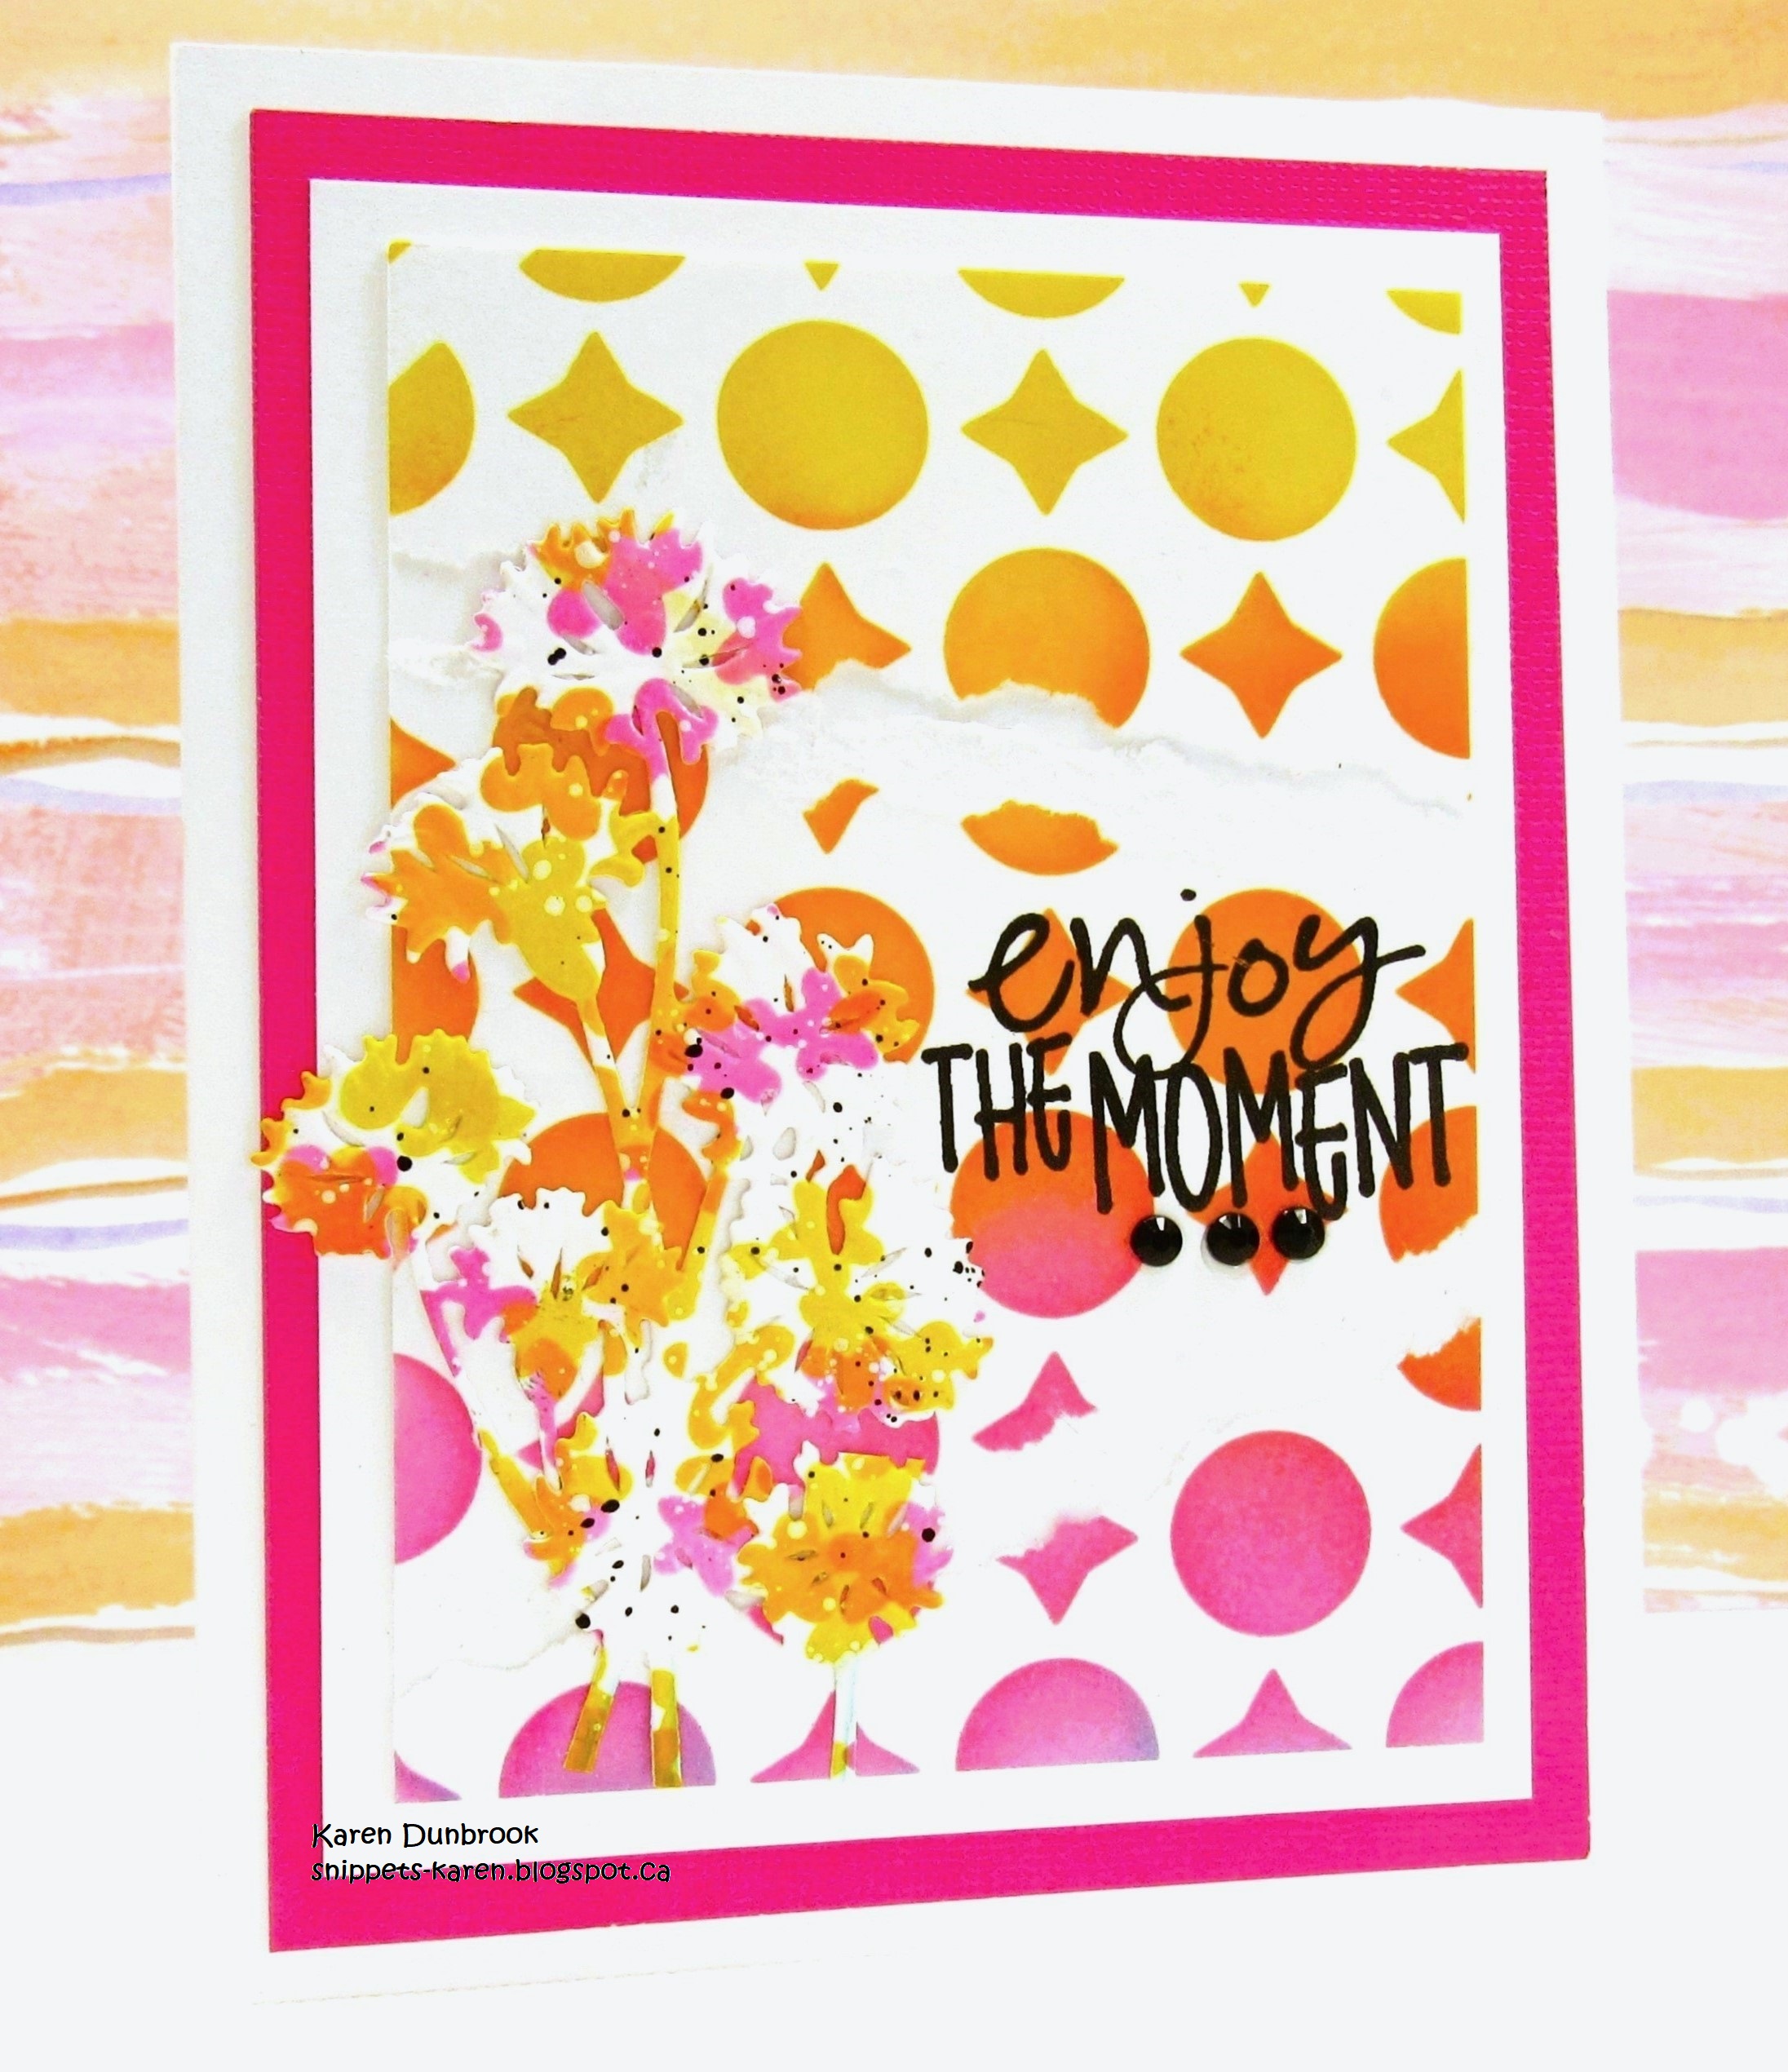
They both use the same stencil and same colours, but the background design looks totally different.

So, meet the newly released stencil from A Colorful Life Designs called 

So, here's what I did to create my cards.
  • I placed the Chunky Chevrons stencil over a piece of white cardstock and inked it up with some Picked Raspberry and some Ripe Persimmon Distress Oxide ink.
  • I wiped the stencil off, flipped it upside down and inked again with the same colours in the same areas.  It made a fun, patterned background.
  • I placed the stenciled panel into my Misti and stamped the flowers and the sentiment.
  • I splattered over the flowers with my black Posca pen.
  • I glued the finished piece onto some white cardstock, then orange and then onto an A2 sized card base.


So now onto CARD #2

  • I cut another piece of white cardstock and placed the Chunky Chevrons stencil onto the paper and inked with some Picked Raspberry and some Ripe Persimmon Distress Oxide ink.
  • I lifted the stencil off but to get a different look then the card above, I flipped the stencil upside down and then tried to match up the chevrons instead of off setting them and inked with the same colours again.
  • I placed the panel into my Misti and stamped the flowers to one side and added the sentiment to the side.  
  • I used my black Posca pen to splatter just around the flowers.
  • I glued the dried piece onto some pink cardstock and then onto an A2 sized card base.

Here is the stencil I used for both cards:

Discount Code for A Colorful Life Designs
(Affiliate with no extra cost to you) 

Thanks so much for coming by and taking a look.

Little Red Wagon- CREATE YOUR OWN BACKGROUND
Crafts Galore Encore- ANYTHING GOES
Sparkles- APRIL SHOWERS BRING MAY FLOWERS
Dragonfly Dreams- USE A STENCIL

Supplies
Stamps- CARD #1- Star Burst (Lavinia), Just Be Happy (Visible Image)
CARD #2- Noteworthy (STAMPlorations); Insightful Meadow (Unity)
Inks- Verafine Clair, DOX
Paper-heavy white (Scribes Nook- Waterloo, Ont.)
Accessories and Tools- stencil (A Colorful Life Designs); Misti (My Sweet Petunia); 
black Posca pen

Sunday 12 May 2024

Oh Boy, It's Your Birthday!

Welcome
I really enjoy making masculine cards and when I saw this newly released stencil from A Colorful Life Designs, I knew what I wanted to do.  Love how it turned out!
So meet the new for May stencil called 

So, here's what I did to create my card.
  • I cut a piece of white cardstock and placed the Right Angles stencil over that.  I inked the whole panel with some Salty Ocean Distress Oxide ink.
  • I removed the stencil, cleaned it off and repositioned it again.  This time I inked with some Versafine Clair Nocturne ink.
  • Next, I stamped the running shoes with more of the black, then die cut them out.  
  • I stamped the sentiment with some more of the Salty Ocean DOX ink and die cut that out too.
  • I glued the stenciled panel onto a piece of black cardstock, then onto and A2 sized card base.
  • To help bring attention to my sentiment, I cut a strip of black cardstock and added the sentiment over that with some foam tape.
  • Finally, I used some more foam tape to add the running shoes under the sentiment.

Here is the stencil I used:

Discount Code for A Colorful Life Designs
(Affiliate with no extra cost to you) 

Thanks so much for coming by and taking a look.

Adding my card to these challenges:
Little Red Wagon- CREATE YOUR OWN BKG
Simon Says Wed.- USE DIE CUTS
Fab 'n' Funky- FOR A CHILD, BABY or TEEN

Supplies
Stamps- Sock Hop (Catherine Pooler); Big and Bold Sentiment and die (SSS)
Inks- DOX, Versafine Clair
Paper- heavy white (Scribes Nook- Waterloo, Ont.)
Accessories and Tools- stencil (A Colorful Life Designs); Misti (My Sweet Petunia)

Monday 6 May 2024

Enjoy Your Moments


Good Morning
Spring is in the air so I decided to use this new stencil from A Colorful Life Designs to create a fun background and add some spring-like flowers.
The new stencil is called:

So, here's what I did to create my card.
  • I placed the Classic Circus stencil over a piece of white cardstock and beginning at the top and moving my way down, I inked with some Fossilized Amber, Ripe Persimmon and some Picked Raspberry Distress Oxide inks.
  • To create a bit of a different look to the background, I tore the stenciled cardstock into 3 pieces and glued them onto another piece of white cardstock.
  • I searched through my scrap box for a piece of inked cardstock that had the colours of my background in it.  (I keep a box of all the background I don't use or don't quite work out for just this purpose)  I found this toss off and die cut the flowers from it and splattered them with my black Posca pen to help them stand out a bit more against the background.
  • I glued the flowers over to the side of my stenciled panel and then stamped the sentiment with some black ink beside it.
  • I glued the stenciled panel onto a piece of pink cardstock, then onto an A2 sized card base and added 3 black gems under the sentiment.


Here is the stencil I used:

Discount Code for A Colorful Life Designs
(Affiliate with no extra cost to you) 

Thanks so much for coming by and taking a look.

Adding my card to these challenges:
Simon Says Wed.- FEMININE
Craft Rocket- FLOWERS

Supplies
Stamps- Enjoy the Moment (Daisy Bucket- no longer in business)
Inks- Versafine Clair; DOX
Paper- heavy white (Scribes Nook- Waterloo, Ont.)
Accessories and Tools- stencil (A Colorful Life Designs); black Posca pen;
Misti (My Sweet Petunia); TE Blending Brushes;
Dandelion Posies die (Creative Expressions)

Wednesday 1 May 2024

I Appreciate You


Good Morning
I'm excited for a new month which means 21 fun new releases from A Colorful Life Designs.
So here's one of the new stencils called

So, here's what I did to create my card.
  • I placed the Classic Circus stencil over a piece of white cardstock then masked the top part off on an angle with some low tack tape and inked with some Faded Jeans Distress Oxide ink.  I repeated that step along the bottom edge as well.
  • Leaving the stencil in place, I moved my low tack tape to mask off the center area and then inked with some Peacock Feathers DOX ink.
  • Next, I used my ScorPal to add the perforated lines between the different ink colours.
  • I splattered the whole panel and set aside to dry.
  • I die cut the thanks from some paper I inked with more of the Faded Jeans DOX ink and then die cut the flowers from some white cardstock.
  • When the panel was dry, I glued it onto a piece of white cardstock, then onto a piece of navy and then onto and A2 sized card front.
  • I glued the sentiment along the perforated line and then added the flowers beside that.

Here is the stencil I used:

Lots of New Bling Too!

Discount Code for A Colorful Life Designs
(Affiliate with no extra cost to you) 

Thanks so much for coming by and taking a look.

Simon Says Wed.- ANYTHING GOES
OPTION- SPRING/FLOWERS
Allsorts- STENCIL

Supplies
Stamps- none
Inks- DOX
Paper- heavy white (Scribes Nook- Waterloo, Ont.)
Accessories and Tools- stencil (A Colorful Life Designs); TE Blending Brushes;
Thanks die (SSS); Fresh Daisies die (SSS); white Posca pen

Sunday 28 April 2024

Blackout Embossed Daisy


Welcome
This week, I'm hosting the TLC Challenge (Technique Lovers) over at Splitcoast Stampers.

The technique we will be playing with today is called:
It will give you stunning results as you will see.  The trick it to use the Debossed side of the cardstock.

So, here's what I did to create my card.
  • I took a piece of white cardstock and embossed it using the Spoon Daisy Embossing Folder from Altenew.
  • I turned my cardstock to the DEBOSSED side and using my blending brushes, I added colour to the flower by randomly rubbing the ink over the embossing.  At this point, you don't have to be precise with your inking because it will be getting covered up with the black ink.  The Distress Oxide colours I used were:  Fossilized Amber, Picked Raspberry and some Peacock Feathers.
  • After I was happy with the inking, I took my Versafine Clair Noir black ink pad, held it flat onto the panel and rubbed until the black ink covered all the card panel.
  • I splattered with my white Posca pen and then set aside to dry.
  • While that dried, I stamped the sentiment with some Versamark ink and then white heat embossed it on the black cardstock.
  • I glued the dried panel onto a piece of yellow cardstock, then a piece of blue and then finally onto an A2 sized card base.  
  • Finally, I added the sentiment across the bottom using some foam tape.

I hope you give it a try.  
Thanks so much for coming by and taking a look.

Adding my card to these challenges:
Simon Says Wed.- ANYTHING GOES
Stamping Sensations- MOOD BOARD/ ANYTHING GOES
Can You Handle the Pressure?- ANYTHING GOES WITH A TWIST OF FEMININE


Supplies
Stamps- Simple Strips (TE)
Inks- Versafine Clair; Versamark; DOX
Paper- heavy white (Scribes Nook- Waterloo, Ont.)
Accessories and Tools- Daisy EB folder (Altenew); TE Blending Brushes; 
white Posca pen; foam tape; white embossing powder

Saturday 27 April 2024

Party Time

Good Morning
I had fun making this birthday card using 2 newly released stencils from A Colorful Life Designs called

So, here's what I did to create my card.
  • I placed a piece of white cardstock onto my Make Art Station and then put the Rocks stencil over that.  
  • I began at the top of my cardstock and inked with some Cracked Pistachio Distress Oxide.  I moved on down my cardstock inking with some Villainous Potion and then some Peacock Feathers along the bottom.
  • Leaving that stencil in place, I put the Four Squares stencil over it and inked again using the same colours to match the areas in the background.  It added lots of interest and details to the design.
  • Using the eraser on the end of a pencil, I added the dots between the stenciled squares.
  • I splattered with my white Posca pen and then set aside to dry.
  • I die cut the sentiment from white paper 3 times and inked one of them with the same colours I had used on the background.  I glued the 2 white ones together and then glued the inked one on the top, offsetting it a bit so it would show up better against the background.
  • I took a piece of purple cardstock and die cut the edge of it, then glued that onto an A2 sized card base.  I added the stenciled panel over that.  
  • Lastly, I glued the sentiment right over the middle of the panel.

Here are the stencils I used:


Discount Code for A Colorful Life Designs
(Affiliate with no extra cost to you) 

Thanks so much for coming by and taking a look.

Adding my card to these challenges:
Simon Says Wed.- ANYTHING GOES
Cut it Up- STARTS WITH A 'B'

Supplies
Stamps- none
Inks- DOX
Paper- heavy white (Scribes Nook- Waterloo, Ont.)
Accessories and Tools- stencils (A Colorful Life Designs); blending brushes;
Make Art Station (Ranger); Big birthday die (Amazon); white Posca pen; 
Diagonal Stitch Rectangle (Taylored Expressions)

Sunday 21 April 2024

Hello Spring

Welcome
Today's card features 2 new stencil releases this month from A Colorful Life Designs called
I combined them with some fun colours and patterns.

So, here's what I did to create my card.
  • I began by placing a piece of white cardstock onto my Make Art Station and then put the Intersections stencil over just the top half of my cardstock panel.  
  • Next, I inked it up with a few different Distress Oxide inks.  These are the colours I used:  Fossilized Amber, Ripe Persimmon and Picked Raspberry.
  • I lifted the stencil off and repositioned it across the bottom part of my cardstock and inked again with the same colours as mentioned above.
  • I took another piece of white cardstock and inked a portion of the Rotating Rings stencil.  Again, I used the same colours as mentioned above.  I used a circle die and cut that out.
  • I die cut the sentiment from some more white cardstock 3 times and inked the top one to match the background.
  • I glued the stenciled card front onto a piece of pink and then onto an A2 card base.
  • I used some foam tape to add the circle over the middle of my card front and glued the sentiment onto that.

Here are the stencils I used:


Discount Code for A Colorful Life Designs
(Affiliate with no extra cost to you) 

Thanks so much for the visit!

Adding my card to these challenges:
Simon Says Wed.- STENCIL IT
Simon Says Mon.- MAKE YOUR OWN BKG

Supplies
Stamps- NONE
Inks- DOX
Paper- heavy white (Scribes Nook- Waterloo, Ont.)
Accessories and Tools- stencils (A Colorful Life Designs); blending Brushes;
Make Art Station (Ranger); Circle die (Hero Arts); Hello Spring die (Amazon)